Showing posts with label Christmas ideas. Show all posts

Sunday, December 18, 2011

DIY Etched 'Christmasy Words' Wine Glasses

I used Instagram Lomo-fi... trying to get more detail to see the words.  I need to work on camera skills

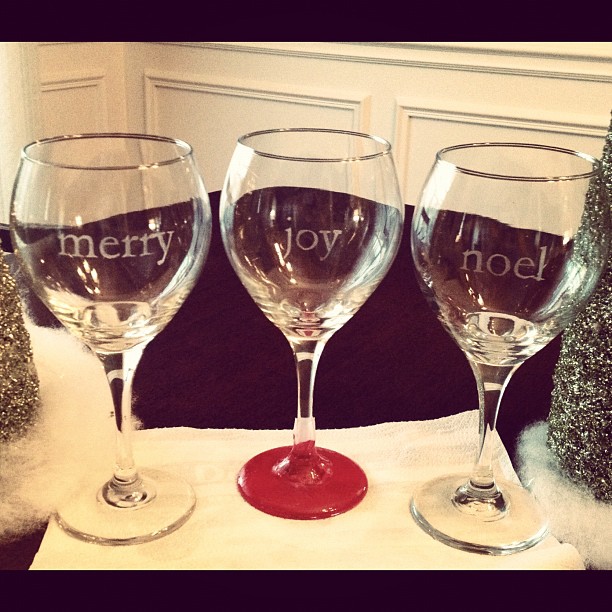
While at Hobby Lobby, I found this amazing, yet rather dangerous, cream that will etch glass for you.  It is called Armour Etch.  If you go buy it, do not forget to cut out a coupon from their website!  The large bottle was $20 without the coupon.  Armour Etch is super simple to use... just takes a bit of planning if you do not have a Cricut or Silhouette (which I do not).  I had been planning to try to paint some wine glasses for my mom for Christmas, but then thought etching words into the wine glasses might be even cooler.  Here is how 'joy' turned out:

Joy using Hefe from Instagram.
Overall, I am happy with the way they look, although the words would have been much more crisp if I had a silhouette rather than having to hand cut with an exacto knife.  My hubs said the hand cutting makes them look more "vintage" ::shrugs:: Works for me!

Here is what I did, first I used 72 pt font (Garamond) to print out Christmasy words, like joy, merry, believe, noel, peace.  I then cut a box around the words, and taped it to contact paper.  I then also cut out a box around the word on the contact paper, and taped the whole thing down on my cutting mat.


Once I taped it down, I cut out the insides of letters first (like o, e,) and set the inside part aside for later.  I then attempted to cut carefully around the edges.  This is when I realized that serifs are NOT my friend. Pretend you didn't notice the wonky letters.  Also, it is hard to cut curves with a straight knife.  Just saying.


Once I had all the letters cut out, I peeled the paper word off of the contact paper to make sure it cut all the way through, and then peeled the backing off the contact paper.  I placed the words on the glass at a point I thought was a little more on the straight side.  Once the contact paper was on, I just pushed bubbles out with my nail.  I also carefully placed the inside of the "o" and "e" on (using the exacto knife for placement helped).

Ignore the dirty windows.  They were clean until the farmer took his corn out, and now dirt always blows on them.

You then slather the cream on, and wait 5 minutes.  Rinse it off with warm water.  Do not touch it, or try to eat it.  The warnings on the bottle are giving me anxiety attacks... like I might accidentally swallow some and etch my stomach.


And voila... some cute etched wine glasses for Christmas dinner!

Instagram Brannan

Now... in the picture above, you might notice that my Joy cup has a red bottom.  I decided to attempt to paint the bottom red... we'll see how it looks when dry and baked.  I used tape around the stem in order to try for a clean line.  The paint I am using is called Vitrea 160 (by Pebeo).  It is a transparent paint... in Pepper Red.  I am using this paint because if you mess up, it easily wipes off before it dries.  Also, because after it dries you bake it in the oven, the glasses are then washable and more durable.  I think it is actually dishwasher safe too, but I would have to double check.

The great thing about this project, is that it is relatively inexpensive, even with the more pricey Armour Etch.  I used a 40% off coupon bringing it down to $12.  This bottle could have made like 100 wine glasses, so I will be etching LOTS of stuff soon.  I have plans for that cream! The wine glasses I got at the Dollar Tree for, yep... a dollar each.  The paint was $5.  Contact paper was like $3. 

All in all, a successful DIY for me!

Friday, December 16, 2011

A shorty...

Not much to report today, except that I just wasted over three hours on a photobook that didn't save. It even dumped the pictures out of the storyline. I am fuming.

On the plus side, I think this gift I got from one of the kids at school is such a cute idea... It is even in a glass container! And is filled with white chocolate popcorn! It is so cute, it is ok that I can't eat it right now. Hands off hubs!

Monday, December 12, 2011

A Christmas tutu for my little girl.

I love all of the little tutus out there for little girls.  They are really adorable!  Just look at how darling Ava was in her 1 year photos:
Photo by Amy Tripple Photography
 On my quest to find an adorable fall tutu, I looked carefully at how they were made.  This particular one had a crocheted band to make it into more of a dress, but really it was just a bunch of tulle tied around a band.  And for that... I paid $50 dollars.  I know... remember though, I have a hard time finding deals.  Good thing I used it for her Halloween costume too!

I wanted another one in Christmas colors-- red and white-- sort of like a candy cane.  And so I thought to myself, I bet I could give it a go... here is what I came up with.

Materials:
2 rolls of tulle (red and white)- I bought the Wyla brand at Joann's in their wedding section. $2.24 each.
1 package of elastic- I bought the 3/4 inch, and it was about $2.50
1 spool of satin ribbon - about $2.00
needle
thread
** Did you catch that this was like $10 to make?  Less once I factor in I did not use up all of my supplies.

I found it easier to cut a bunch of the strips all at once.  Once I determined my length I just used that strip as a template.  Width-wise, I just cut the strips in half.  I would layer several in a row and then fold it over several times to make it easier to cut the width.  Cutting tulle is a little bit annoying sometimes- don't say I didn't warn you.

For size, all I did was measure the elastic around a pair of Ava's pants, and overlap about 1 inch (I wanted it to be tight enough to not fall off).  I then cut a length of tulle, and held it against her pants to try to gauge it at about knee length.  I figured as it got fuller, it might get a little shorter.  Remember that you are going to fold the tulle strip in half, so you want to double the length from the waist to the knee.  See below for my horrible hand-sewing job.  But it is sturdy so it will be fine.


It is difficult to tell, but I tied 2 strips of red to 1 strip of white... in order to knot around the elastic, all I did was fold the tulle in half, place the strip behind the elastic with the loop upside down, bring the tulle around the elastic and pull it through the loop.  You can sort of see all of the "knots" in a row where I pulled the tulle through.  Make sure all of your "knots" are all on the same side of the elastic.


Once I finished the hours of tying tulle (while watching movies at night), I turned the tutu inside out (so that all the little knots were on the inside) and tied a little bow on.

  
Very easy, even if it does take a bit of time!


Once I figure out how to get Ava to stand still, I will have to add a picture of her in her tutu... it looks adorable on her!

Saturday, December 10, 2011

The Twelve Days of Christmas- Treats for Mr. Claus

This year, I started a new tradition in our household.  I wanted to let my husband know how much I care about him, while combining a few of his favorite treats.

Fairy Tale Cookie from Movable Feast.

So... I am in the middle of giving him 12 days of little surprises for him to find.  I admit, I have no idea when the 12 days of Christmas really is.  Does it start December 1st?  December 13th and end on Christmas Eve?  December 14th and end Christmas Day?  Or is it the the time between Christmas and the Epiphany?  Anyway, I couldn't wait so I just started it.

So far, here is what I have come up with, again, based on treats I know he likes.  I leave him a little note that says "On the First Day of Christmas, my True Love gave to me, a little note to say..."

1- I'm nuts about you. (little canister of nuts)
2- I love you to pieces. (Reese's Pieces)
3- I wouldn't trade you in for anything. (100 Grand bar)
4- I would feel like a fish out of water without you. (Swedish fish)
5- Take a little break when work is leaving you stressed. (Take 5)
6- Thank you for being my fairy tale ending. (Fairy Tale Cookies)
7- I think you're a cutie!  Hubba Hubba! (Hot Tamales)


I have all of the rest planned out, but since I know he will snoop to find out what else he gets, I will have to update this post as I go along.

I am really loving this idea so far, and as Ava gets older, I will have to include her in the tradition.

p.s.  If you live in the area, you must try the Fairy Tale cookies... right now they have the original (slightly almond flavored), as well as Maple (they sometimes have Rose Water, Coconut, Cocoa, Citrus).  Some day I will figure out how to make this icing.  It literally melts in your mouth when you bite into it.  This is seriously the best frosted sugar cookie on the planet.  Yes.  The planet.

Monday, December 5, 2011

A Surprise From Santa... Ideas that will make your kids freak!

Eyes wide open, a sharp intake of breath, a gigantic grin, and the light behind their eyes that indicates the recognition that what they are seeing... is truly awesome!  These are the reactions we love to see in our kids... well that, and when we manage to scare the heck out of them!  Last year, my husband stumbled upon a website that sends a personalized message from Santa to your child.  It is an extremely well done video, and the look on my nephew's face was absolutely priceless!  He was frozen in shock, and then so excited that Santa knew all about him.

This year, with the help of Pinterest, I found a couple of other awesome ideas that I wanted to share... take a peek:
  • Portable North Pole- website that will send personalized video message to your child, you even upload a photo of their face to be included in the message.
Picture via Portable North Pole's website


  • Capture The Magic- website that allows you to upload a picture of your room with your Christmas tree in it, and add a Santa to the picture.
Picture via Capture the Magic's website.
  • Santa Stationery from Design Editor- Awesome blog that has tons of craft ideas, free downloads (including this Santa letterhead), as well as free fonts, etc.
Photo from Design Editor, free download here too.
Hope you and your kids enjoy these!